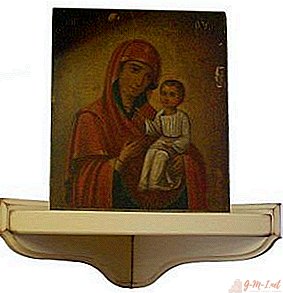
 Everyone is trying to make their room or hallway more comfortable. Especially if you are a believer, you probably wondered where to store the sacred icons. Of course, you can buy a ready-made shelf, but if you wanted to make it in your own style, then you came to the address. For such cases, there are many ways to manually design shelves that anyone can do. In this article, we will analyze the manufacture of some types of shelves, step by step describe the sequence of execution and discuss several options for their fastening to the wall.Before you make a shelf for icons with your own hands, you need to draw drawings or find a photo on the Internet.
Possible design options
In fact, the variation of the coasters is quite large. Compared to other regiments, in this case, the main component is the location on it of only icons and no foreign objects. For clergymen this is considered as a home holy monastery. The do-it-yourself shelf for icons should be in the following format: all frames should be visible, so the location of each of them should not overlap the others. It is also necessary to determine the free space for new icons, so that in the future there are where to place them. Or choose a form in which it would be possible to attach an additional platform.
There are several ways to design stands:
- Direct tiered.
- Corner multi-tiered.
- Direct single-tier.
- Corner single-tier.
The shelf is designed in accordance with the interior, location and size of the room.
Necessary materials and tools
There are no particular restrictions on the use of the material. In addition to wood, metal or plastic can be used. But most often they use wood materials, due to the ease of processing, quality and relatively inexpensive price.
To create the stand you will need the following tools:
- roulette.
- wood hacksaw or jigsaw.
- screwdriver with drills.
- hammer.
- screwdriver.
Tools required for construction:
- Oak planks or similar in strength.
- Plywood from chipboard or OSB.
- Glue for wood.
- Steel corners and hinges for wall mounting.
- Screws and dowels.
- Caps for screw caps.
- Varnish for preserving the quality of wood.
- Reiki 20-40 mm wide.
- Sandpaper.
Decoration options
The choice of decor is determined according to your tastes or interior. In order to make your shelf look beautiful and harmonious, you can use different decoration methods along with icons:
- waxing;
- stain of various colors;
- art carving;
- patterned burning or engraving;
- varnishing;
- wood painting, etc.
It is not recommended to use a large amount of decor, as it can overshadow the icons.

Parts manufacturing
The design of the shelf includes several parts. Most often, the stand is made of the following parts:
- racks;
- side panels
- shelves;
- legs (if the shelf is not wall);
- sides.
There are a fairly large number of shelves and with a complex design. The choice of the size of each part depends on the number of icons, the location of the shelf itself and the shape of the parts.
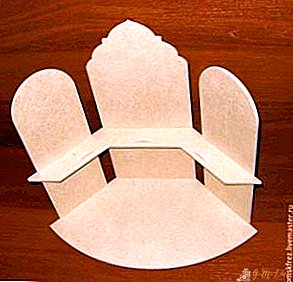
Direct single-tier rack
 Before manufacturing, you need to consider all the nuances, prepare materials and prepare a drawing of all the details. Once the drawing is drawn, it can be transferred to MDF or particleboard, from which to cut out the templates.
- Templates need to be transferred to the material from which all the details will be made (oak boards or any other). Care should be taken to avoid damage to the template and the future part. To do this, it is better to use an electric jigsaw.
- After sawing out the parts, their edges are rubbed with sandpaper and rubbed with a mill.
- To connect each part, you can use the mosaic method of connection. First of all, in a pre-prepared place on the side panel, holes are cut out - nests for the shelf platform. At the platform, rods for insertion are cut. Fastening occurs due to the connection of the rod platform with the holes of the side panels. For higher strength use glue for fastening. The second method of fastening is screwing in screws. For this platform (if there are several) are installed at the bottom and in the middle (or at choice). Holes are drilled through the sides of the panels, after which screws are screwed. In order for the screws to be invisible, plugs are attached to them.
- After connecting all the parts, metal loops are attached to the upper edges of the panel.
- Holes for fixing bolts are drilled into the wall, on which the shelf will be suspended. It is necessary to take into account the weight of the shelf with icons so that the dowels do not break at any time.
- At the end of fastening, the product is treated with protective agents - varnish and / or stain. Colors are chosen in accordance with the interior or at your discretion.
 Before manufacturing, you need to consider all the nuances, prepare materials and prepare a drawing of all the details. Once the drawing is drawn, it can be transferred to MDF or particleboard, from which to cut out the templates.
Corner shelf
Most often, corner shelves are planned for 2 or 3 tiers. The basis for this manufacturing option will be taken of fiberboard material. In order to make a stand you need:
- A rectangular triangle is drawn on a fiberboard sheet, with a pencil or marker. To facilitate the calculations, you can take the sizes 280/280/380.
 The drawn figure is cut out with a file on a tree or with an electric jigsaw.
- After sawing all the details are sanded with sandpaper.
- Having made all the parts smooth, they must be connected to each other. This can be done with wood screws or glue.
- To prevent deterioration and dampness, the entire structure must be varnished. Cutting of decorative patterns is done before varnishing.
- Metal loops are attached to the upper corners of the walls.
- In the corner part at a given level in the wall, holes are drilled for fastening the hinges.
- The corner shelf is attached to the dowel, after calculating the maximum weight, in order to avoid breaking from the hinges.
 The drawn figure is cut out with a file on a tree or with an electric jigsaw.
Mounting Options
Fastening shelves can be done in several ways. The first of them, using dowels. To begin with, the loops are installed on the product, then holes are drilled in the wall. In this case, you need to choose the right height, preferably at least 1.7 meters from the floor. After determining the height, the shelf is attached to the wall with dowels. This method is the most frequent, since it does not require much effort and is quite practical.
You can also use brackets for mounting. An arm is a part or structure used for vertical or horizontal mounting. They are different and depend on the type of mount. There are brackets for planting structures; usually simple single-tier shelves are installed on them, and brackets for hanging mounting - they are used not only for installing shelves, but also for mounting many devices, equipment.
Leave Your Comment