 The use of kitchen appliances for cooking delicious food does not always cause positive emotions. The procurement of juices for the winter period requires special reliability of the selected model of juicer. The high cost of quality equipment often makes it inaccessible. Making a reliable juicer with your own hands will solve the problem of providing your own household with reliable equipment for harvesting vitamins.
Principle of operation
By design features, two types of juicers are distinguished:
- centrifugal;
- screw screws.
The principle of operation of the former is that centrifugal force at high speeds separates the juice from the pulp. At the same time, the engine and drum heat up, which contributes to the oxidation of the juice, the loss of vitamins and minerals during pressing.
The work of screw juicers is carried out at low speeds, which contributes to the squeezing of juice in a "gentle" mode without heating while preserving all the useful ingredients of the resulting mass.
ATTENTION! The excess of vitamins during screw extraction was found to be 6 times higher than that of centrifugal!
Both methods are used both on an industrial scale and in everyday life. When purchasing a juicer, the consumer often does not think about the method of separating juice from vegetables and fruits. Own manufacturing allows you to carefully study the specifics of the spin cycle and the constructive method of operation of the equipment.
DIY juicer from activator type washing machine
 For hand-made manufacturing, it is necessary to find an unnecessary washer in which the drum did not rotate, as in modern designs, but a shaft with plastic or metal blades for mixing laundry. It is the use of the activator principle of operation of the spent equipment that will allow you to build the required unit for squeezing high-capacity juice.
Phased work will look like this:
- First of all, it is necessary to disassemble the laundry mixing mechanism: remove the activator and drive shaft.
- Prepare a shaft with three or more knives for installation in a regular place of the machine.
- After that, thoroughly wash the inside of the machine and close the drain hole.
- A mesh with holes with a diameter of 1.5 mm is made of aluminum or other stainless material. It is placed inside a centrifuge and firmly attached to the inner surface. The shaft is placed inside the centrifuge, the entire structure is inserted into the regular place of the machine and tightly twisted.
- The time relay, which previously served as a switch, is replaced by a toggle switch, to control the shaft drive.
- Turn on the machine and load the inner cavity of the centrifugal device. For squeezing juice with the help of such a home-made design, there is no need for preliminary cutting of apples.
- When adding a few apples, you need to make sure that the surface of the shaft with the knives is not covered with apple cake. As the inner part of the centrifugal mechanism is filled with waste, the unit is stopped and the inner cavity of the centrifuge is cleaned. Then, set everything in place and continue to squeeze the juice.
ATTENTION! At the discretion of the manufacturer, the body of the centrifugal mechanism can be solid and, then, the juice will be collected inside the centrifuge. Draining the resulting juice will not be easy, because you have to tilt the entire unit.
The resulting juicer design will be able to process a large number of apples. Pre-cut the fruit is not necessary, because the knives located on the shaft, do an excellent job with this function. A big inconvenience of using this design is the need for frequent disassembly of the shaft to completely clean the inner cavity of the centrifugal mechanism. When cleaning without disassembling the shaft, you may be injured by the sharp edges of the cutting knives.
IMPORTANT! In order not to cut yourself while servicing the centrifugal mechanism, use metal devices prefabricated for these purposes.
Juice, which is obtained by pressing, is recommended to pass through cheesecloth after it has stood for some time.
Homemade horizontal loading washing machine juicer
The presence of an old, inoperative automatic washing machine allows you to make a centrifugal type juicer, having spent a small amount of effort. The user of household appliances knows the different modes of operation of the machine, when performing tasks during washing and spinning. It is the latter function, or rather, its restoration that will now allow squeezing not juice, but juice from fruits and vegetables. To implement what is planned, it is necessary:
- Verify drum integrity and motor performance.
- Disassemble the machine, pull out the drum, wash, clean all the internal surfaces of the unit, especially the rubber sealing elements. If necessary, sand out rusty surfaces and scale.
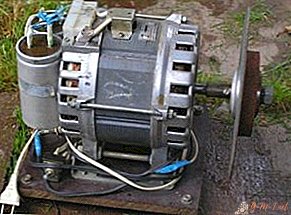
- Using the tester, determine the possibility of the electric motor working in the spin mode, and in the absence of the tester, find the wire for directly turning on the motor at maximum speed. Install the circuit breaker in the open circuit.
- Remove filter and drain pump. Replace the drain hose with a new one or ideally clean the old one. Equip the drain with a ball valve to adjust and control the flow of juice.
- Close, rivet, brew all the channels and openings inside the machine that are not claimed for draining the juice, except for the water supply opening (it is used to wash equipment after pressing). Remove the heater. To clean the finished cavities and check for tightness.
- Set the drum in a regular place, fix and tilt the machine so that the cover for horizontal loading is at the top.
- To test the performance and tightness of sealing all cavities inside the body, forcibly pour water into the machine and stand for 10-15 minutes, after closing the drain valve. In the absence of leaks, the unit turn on and open the drain valve.

ATTENTION! The presence of small leaks during inspection is not a reason for mandatory elimination. By measuring the importance of the location of the leak, the user himself determines the need to repair the detected problem.
After checking, the unit can be loaded with fruits, squeeze juice and preserve it for the winter.
The description of the alteration of one household unit - in another, is made using the skeleton of a washer. Most craftsmen, when converting a washing machine into a juicer, do not use the housing of household appliances for alterations. This is due to the bulkiness and the large number of excess parts of the rectangular design of the washing equipment and the smaller number of cavities to be filled when using the drum and its casing. The principle of alteration and spin operation is important.
REFERENCE! Not all automatic washing machines have a convenient drum casing for conversion into a juicer.
Using the body of an automatic machine is uncomfortable with the presence of a cover, which, when reworked, is replaced with a metal one. It is made of stainless steel or aluminum, with a round neckline in the middle, for loading without stopping equipment. When laying fruit, it is convenient to use a pipe through the opening of which apples are fed into the lower part of the working unit. The variety of design features of remaking a washing machine into a juicer is limited by the user's imagination.
How to make a manual apple press juicer
 Since ancient times, our ancestors used a manual mechanical press to squeeze juice from fruits. Simplicity of design, ease of use, puts it among the most reliable and effective devices for the preparation of vitamins.
The principle of operation of the press for squeezing juice is that the fruits are placed in an immobilized container, the walls of which have openings for the exit of the squeezed out liquid. After loading apples, a piston presses on them, the area of which corresponds to the cross section of the container. Under the influence of pressure, the fruit spreads, and the juice, through the holes, flows into a tray or other device for collecting liquid.
The effort required to crush the apples is very large. Therefore, for effective extraction, a lever system, a helical rod, a jack or hydraulics are used. The manufacture of a simple mechanical press includes the following stages of work:
- From a sheet of stainless steel you need to cut a wide strip, which will become the body of the tank. Then evenly drill holes over the entire area of the cut material.
- From a perforated strip to build a cylinder, the height of which will be several times greater than the diameter. Brew the joint of a round container.
- For the convenience of using the press, a casing of a perforated container is made from the same stainless steel, the diameter of which will be 3-7 cm larger than the first.
- The lower parts of the tank and casing are brewed with round stainless steel lids with a hole in the middle for mounting between each other. In the lower cavity of the casing, a hole is immediately made to drain the juice, if the casing is not used as a container for collecting liquid.
- Now you need to make a support frame. For this, metal profile pipes of rectangular cross section are used. First, the support is welded in the form of a stable square, and then, a frame is welded to the support, to which the piston rod will be attached.
- A hole of a larger diameter than the stem is drilled in the center of the upper beam and a threaded nut is welded.
- Before installing the rod, pick up the piston and attach it to the bottom of the threaded shaft. The piston is made of wood, metal or plastic. The main thing is that he withstand the force of the rod. To do this, a wooden or plastic material is protected with a metal plate.
- The perforated container together with the casing is mounted on a support and fixed. Check the accuracy of the piston coincidence with the tank. If inaccuracies are found, they are eliminated.
IMPORTANT! The diameter of the piston is made 2-3 mm smaller than the size of the capacity of the press, and the rod is positioned clearly in its center. The displacement of the rod will not allow a large force to be evenly distributed over the entire pressure area.
The press is ready for work. Loading, squeezing, unloading waste takes a lot of time. But the quality of the spin with such a press will be the best in comparison with other methods. To speed up the process, an electric motor with a reduction gear or a hydraulic jack is used as a drive.
Making a juicer with your own hands will require some effort and time. These costs are offset by positive emotions when drinking juices at any time of the year.
Leave Your Comment